Homework: Pathfinding
- Assigned
-
- April 9, 2026
- Due
-
- April 23, 2026 10:00pm
- Collaboration
-
-
Regular policies for collaboration apply to this homework assignment.
Make sure you review and understand the policies on the syllabus before you discuss your work on this assignment with anyone else.
- Submitting
-
-
Submit your work by uploading
main.c,movelist.c,movelist.h, and any other files you created or modified to Gradescope. You can submit as many times as you want up until the deadline.
For this assignment, you will be implementing a data structure and a search algorithm to complete the basic movement system for a game. This assignment includes significantly more starter code than earlier assignments. All of the display, input handling, and basic game structure are completed for you. You’ll need to implement a list datatype and a search algorithm (described in detail below) to complete the assignment.
You can run a completed demo version of the game on MathLAN:
$ cd /home/curtsinger/csc161/demos/pathfinding
$ ./pathfinding castle.map
Once you have the demo running you will be able to move with arrow keys or by clicking anywhere in the terminal.
There are two additional maps, blank.map and maze.map, available for you to try.
These maps are also included in your starter code.
Getting Started
You must complete your work for this assignment using a git repository on the class git server.
When you log in you should see a repository called pathfinding-USERNAME, where USERNAME is your college username.
You have access to modify this repository directly, so do not create a fork.
Instead, run the commands below to clone the repository and open it with VSCode:
$ cd ~/csc161/homework
$ git clone https://git.cs.grinnell.edu/csc161/pathfinding-USERNAME.git pathfinding
$ cd pathfinding
$ code .
Starter Code Tour
This assignment includes a significant amount of starter code, and you’ll need to interact with that code as you complete your implementation. The provided code includes comments that should help you understand specific functions and lines, but here is a high-level overview of what you’ll find in each of the files provided with the assignment.
main.c
This is where you’ll find the main function, which includes the main game loop for the program.
You’ll also find the plan_route function in this file, which you’ll be re-implementing in the second half of this assignment.
movelist.h and movelist.c
These files hold the interface and implementation for the movelist_t type.
You’ll need to modify both of these files as you complete the movelist_t implementation in the first half of the assignment.
The movelist.h file also defines the dir_t type, which represents a move in one of the four cardinal directions.
A movelist_t is a list of dir_t values.
util.h and util.c
These files hold the interface and implementation for the sleep_ms function we’ve been using since we started working with ncurses.
You won’t need to modify these files, but if you do add any basic utilities you might choose to add them to these files.
map.h and map.c
These files hold the interface and implementation for the game map.
This includes code to load and display the map, as well as a can_move function that you can call to check if a coordinate on the map is a valid location to move to.
This file defines the cell_t type, although you likely will not need to interact directly with this type as you complete the assignment.
You’ll also find the coord_t type—which the game uses to store an x–y coordinate—defined in this file.
Other Files
The starter code also includes a Makefile that will recompile the pathfinding program any time you edit one of the source or include files above.
If you choose to add more source or include files you will need to modify the Makefile;
we’ll learn more about this while the assignment is out, but there is a good chance you’ll be able to figure out how to make the necessary modifications on your own.
Finally, the starter code repository includes three test map files you can use with the program.
Map files represent a row of cells with a line of characters, and all rows must be the same length.
The map may contain the characters 'W' for walls, 'G' for grass, '~' for water, and 'S' for the start location.
You may find it useful to create new maps to test your implementation in the second half of this assignment, and the blank.map file may be a good starting point.
Step 1: Implement movelist_t
The starter code will compile and run without issue, but you can’t do much with it yet. To compile and run the code, run these commands:
$ make
$ ./pathfinding blank.map
When the program runs it should display a map, but you won’t be able to move around. All you can do is press q to quit the game.
The reason you can’t move in the starter code version of the game is because the code relies on the unimplemented movelist_t data structure.
This is a list structure that stores dir_t values.
Whenever you press an arrow key, the input portion of the game loop will add the move to the movelist.
The game loop will take moves off the list and update the player’s position, but at a rate limited to ten moves per second.
The reason the game uses a list structure to hold moves is not to handle arrow keys;
in fact, the game loop clears the list of moves any time you press a key so there is at most one move pending at any time.
The movelist is required to handle mouse input.
The game loop also listens for mouse clicks, and will call the plan_route function to generate moves any time you click on the map.
The code in plan_route generates moves in the direction of the destination, but can’t route around obstacles;
we’ll revisit that in the second part of this assignment.
Your task for this part is to complete all of the functions in the movelist_t interface.
As you’ll see, this list type allows modifications at both ends of the sequence so it can be used as both a stack and a queue.
You must implement all of the functions in the interface, not just the ones called by the starter code.
There is a good chance you will need to use additional parts of the interface later in the assignment.
You are free to decide whether you use arrays or linked lists to represent the movelist type. Regardless of the implementation strategy you choose, make sure your movelist does not leak memory.
Once you have a working movelist you should be able to move around with both arrow keys and mouse clicks.
Step 2: Pathfinding
Now that you have a working movelist data type, we’re going to re-implement the plan_route function in main.c so it can find routes around obstacles.
Your implementation will find the shortest path to a destination using a technique called breadth-first search.
Search algorithms in computer science are generally either breadth-first or depth-first. When we use depth-first search, we choose one path and explore it fully before exploring any other paths. With breadth-first search, we instead explore all paths one step at a time; we will look at all the locations we can reach in one move, then two moves, three moves, and so on until we find the destination.
The reason we are using breadth-first search is because it will always find the shortest path. Or, rather, a shortest path, since there may be many paths from the starting point to the destination that require the same number of moves. All shortest paths are equally good, so we’ll just choose the first one we find.
The following pseudocode is derived from the Wikipedia article on breadth-first search linked above, and describes the search process:
procedure BFS(start_location):
   let q be a queue
   label start_location as explored
   q.add(start_location)
   while q is not empty:
      c = q.take()
      if c is the goal:
         break
      for each cell n that is a neighbor of c:
         if n is not labeled as explored:
            label n as explored
            label n as reachable from c
            q.add(n)
As you can see, search search algorithm uses a queue of locations in the search space; in our case, the search space is the game map. We begin by placing the starting location in the queue, and continue the process until the queue is empty or we reach the destination. You can think of the queue as holding the “frontier” of the search; each location that is on the edge of the explored space will be in the queue. Every iteration of the loop pushes the frontier outward.
While the pseudocode is a helpful starting point, we’re left to make some decisions about what it means to label a location as explored, or to record that it is reachable from another location. We also need to think about how we will determine the neighbors of a particular location. And finally, you’ll notice this code doesn’t say anything about generating moves to get from the starting point to the destination along the shortest path. Any time you use an algorithm you will need to decide how you will translate these abstract ideas into code. We’ll discuss the implementation approach you need to take for this assignment in the next section.
Implementation Guide
This section will walk through the important implementation details you’ll need to use in your plan_route function.
This section contains screenshots from a modified version of the assignment that shows the search process step by step.
You can run the modified demo yourself on MathLAN to follow along or test other scenarios:
$ cd /home/curtsinger/csc161/demos/pathfinding-algorithm
$ ./pathfinding castle.map
When you run the program as above it will look just like the version you are implementing. However, the behavior is different once you click somewhere on the map. The screenshot below shows the program’s output right after a click:
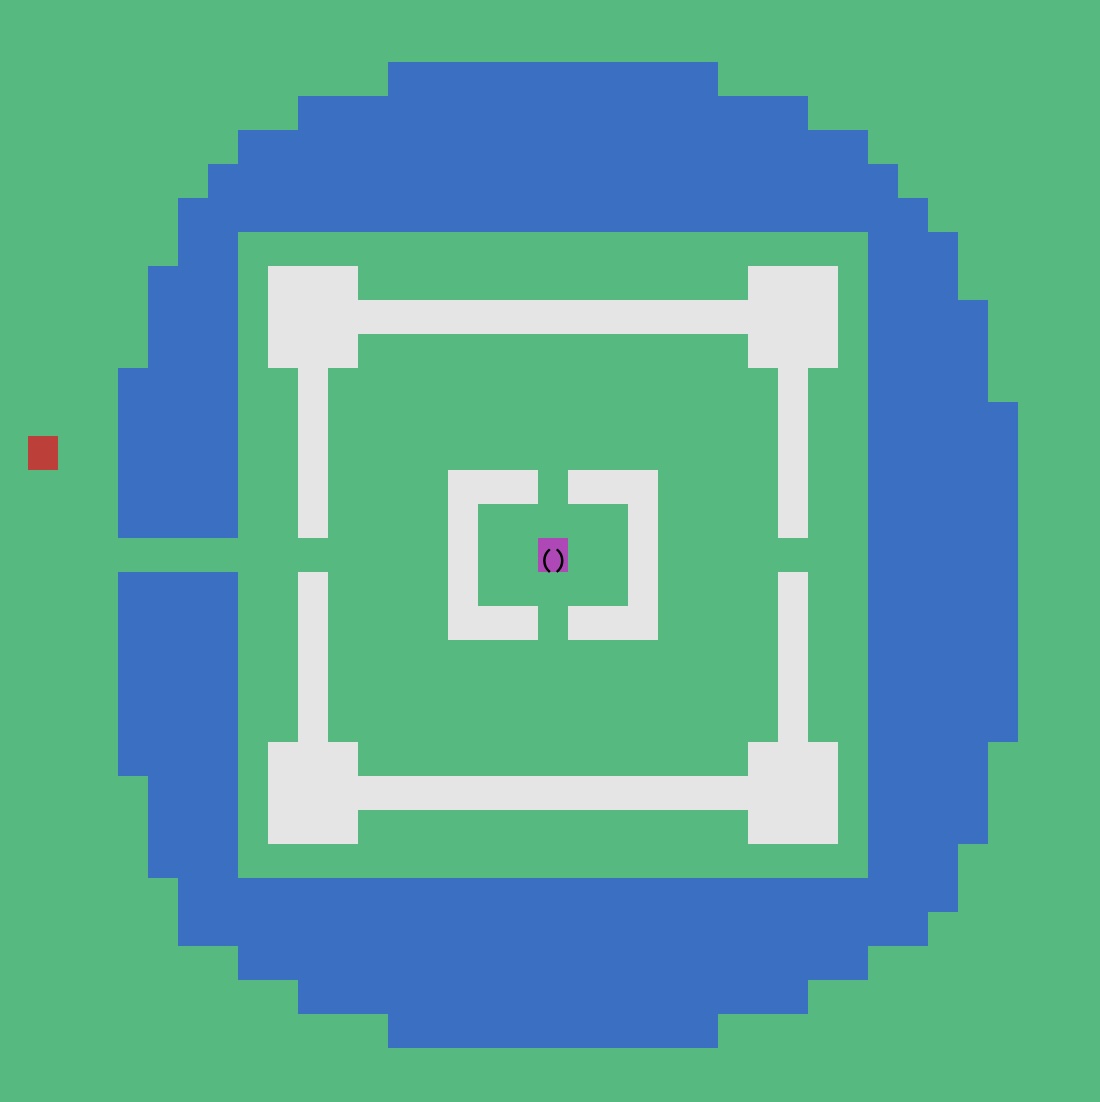
This image shows the search at the beginning of the process, where only the starting point is in the search queue. When you press space, you’ll see the effect of one iteration of the loop:
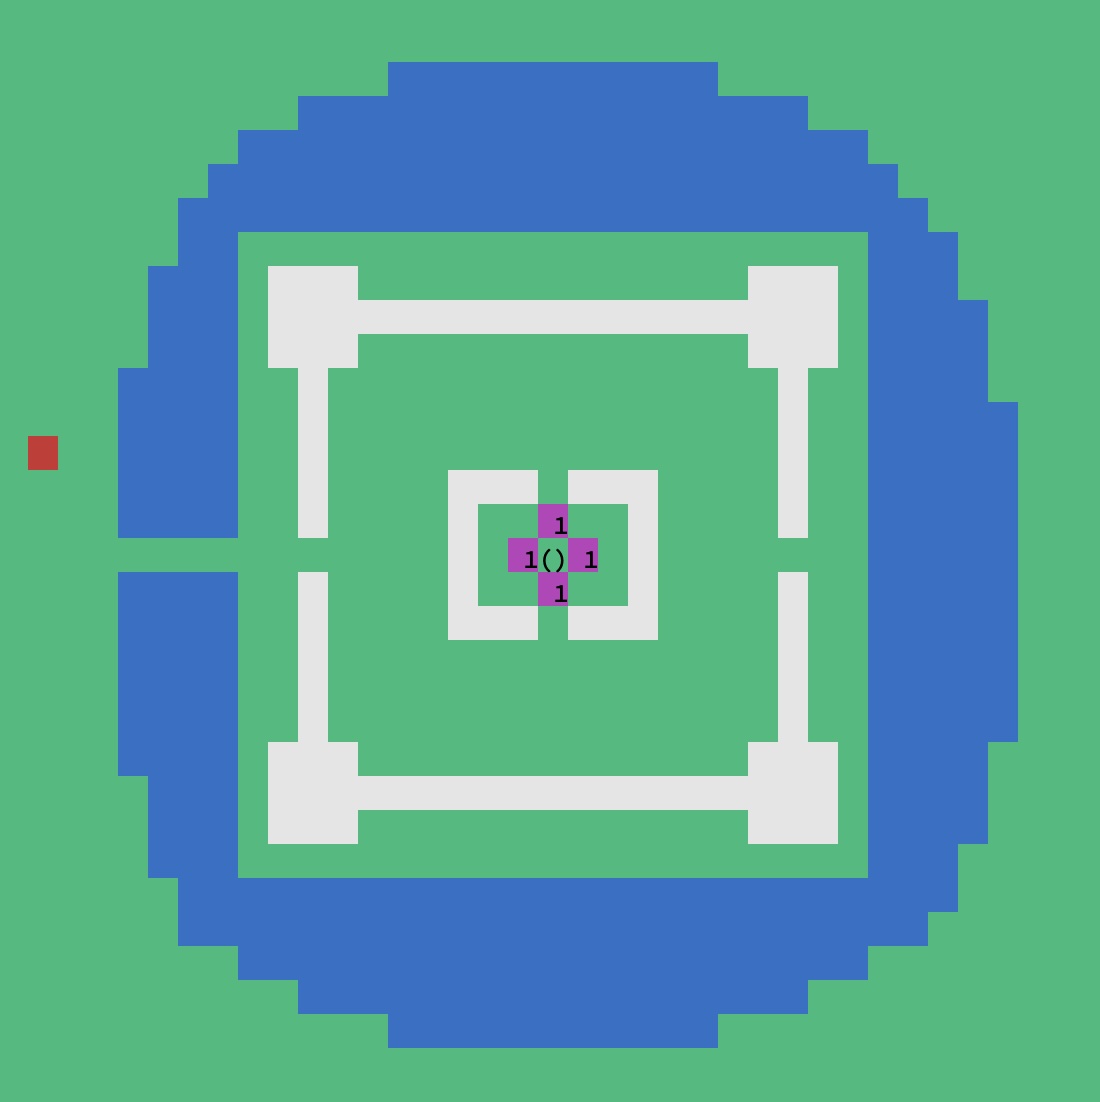
As you can see, the four cells neighboring the starting point are now in the queue.
These cells are also marked with a 1 to indicate that they are reachable in one step from the starting point.
We will use this distance to keep track of which locations have been explored, and later to reconstruct a path.
The easiest way to represent the explored cells and their distances is with an array of integers.
You can represent unexplored cells with a special value (e.g. a very large positive number).
Whenever you reach a cell, record the number of steps it takes to reach that cell in the array.
Using a two-dimensional array is probably the easiest approach, and you’ll be able to avoid the usual pitfalls with 2D arrays in C because you will only need to use the array inside the plan_route function.
Just keep in mind that 2D arrays have to be local arrays;
if you want to store them in space you get from malloc you will need to manually convert from x–y coordinates to one dimensional indices.
Each time you press space the program will run until all the cells in the search frontier have been moved outward. Each iteration of the loop expands just one cell in the frontier, so pressing space will almost always run multiple iterations of the search loop. The screenshot below shows the state of the algorithm after pressing space ten more times:
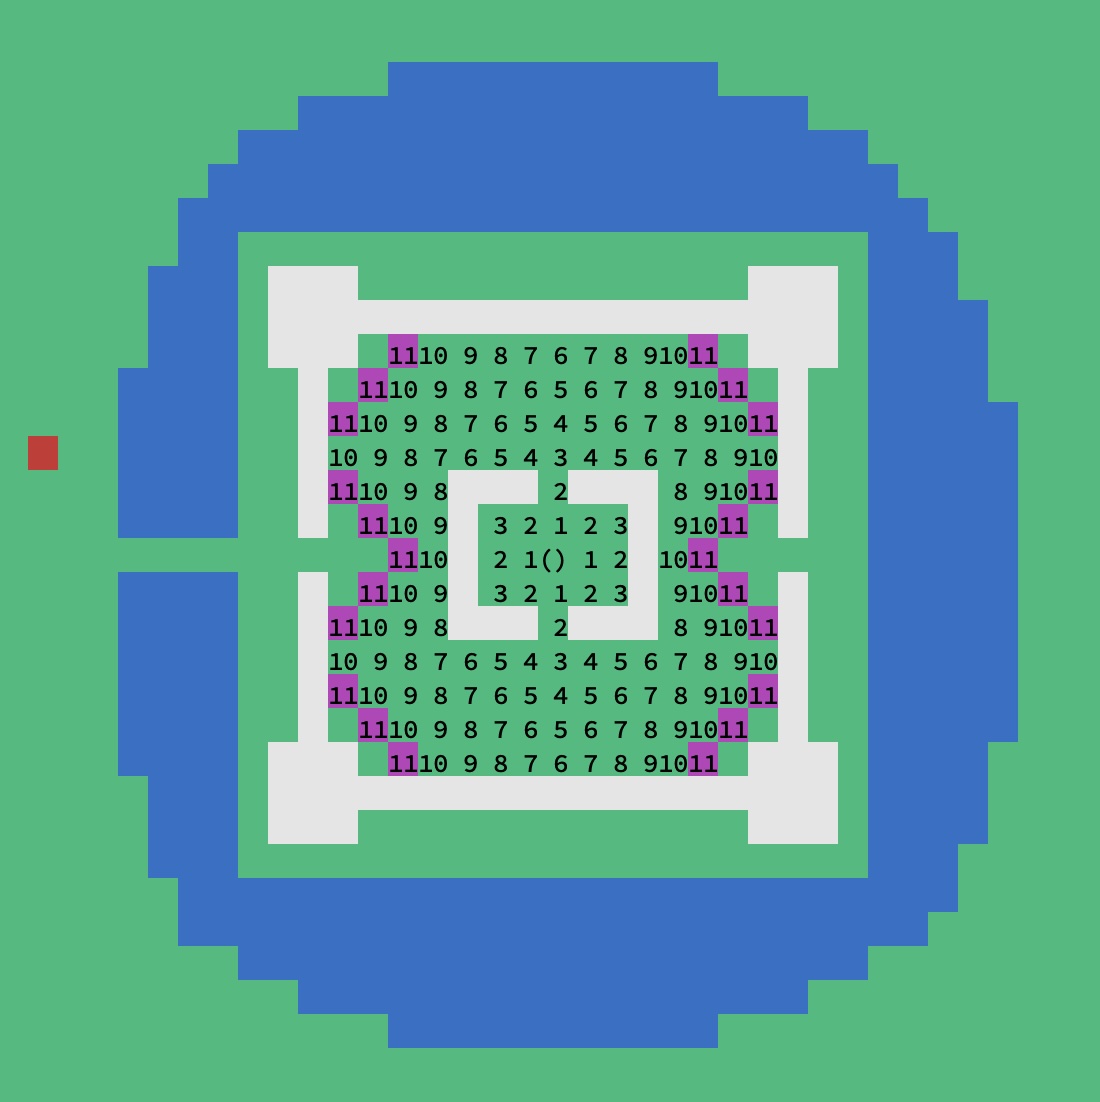
Notice that wall cells are not explored.
The player cannot move onto these cells, so they cannot be part of the shortest path.
You can check whether a cell is a valid place to move using the can_move function declared in map.h.
Pressing space several more times will bring you to this state:
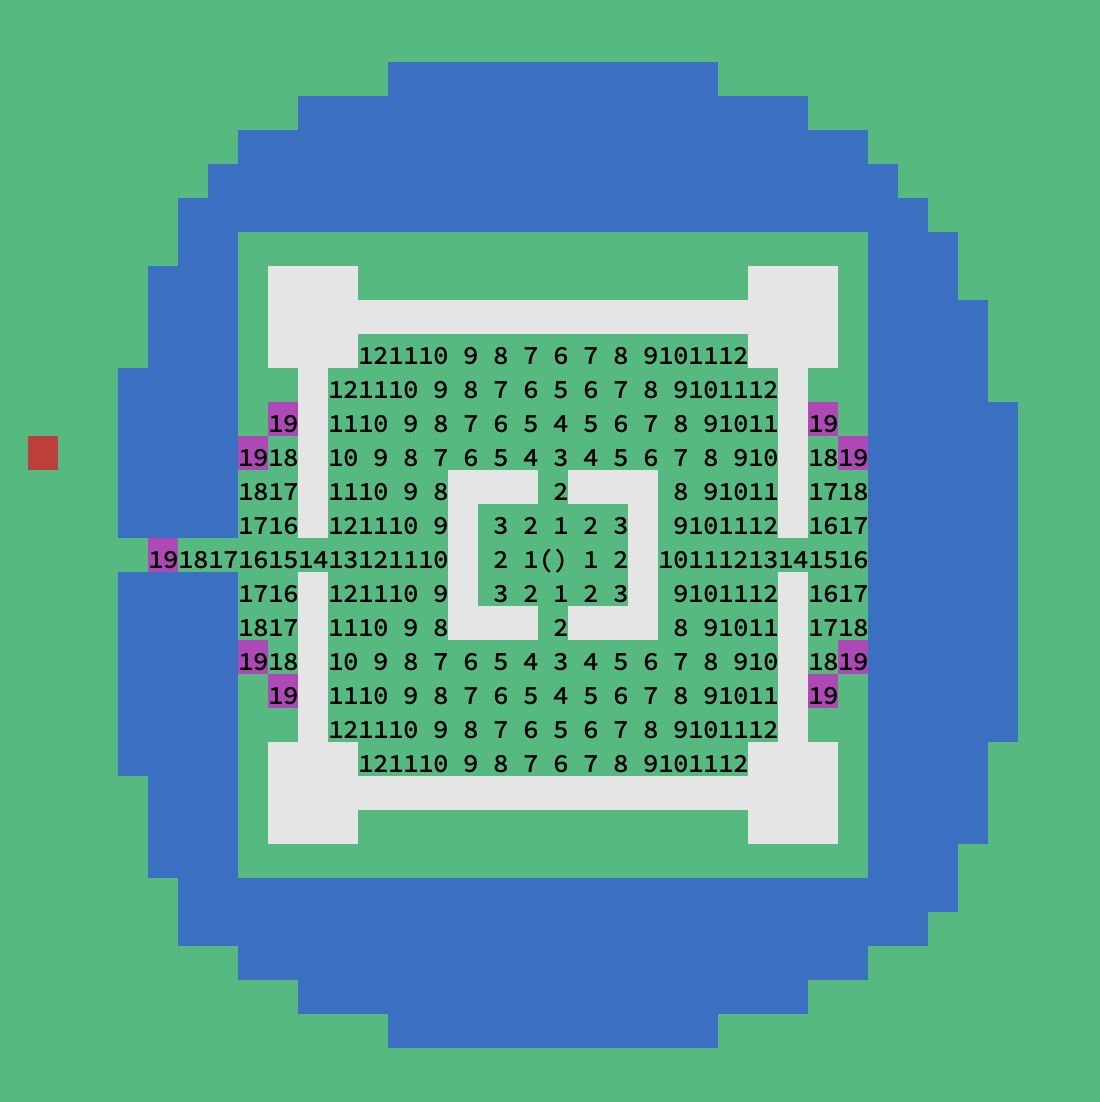
The screenshot above shows how the number of cells in the search frontier can vary. Many cells along the inside edge of the walls were reachable, but had no unexplored neighbors. At some point, the frontier was limited to just the two small gaps in the outer wall. Once the frontier is pushed through these small gaps it continues to expand into open space. Luckily, this behavior naturally falls out of the breadth-first search algorithm.
If you continue pressing space you will eventually reach the point where the destination is included in the search frontier:
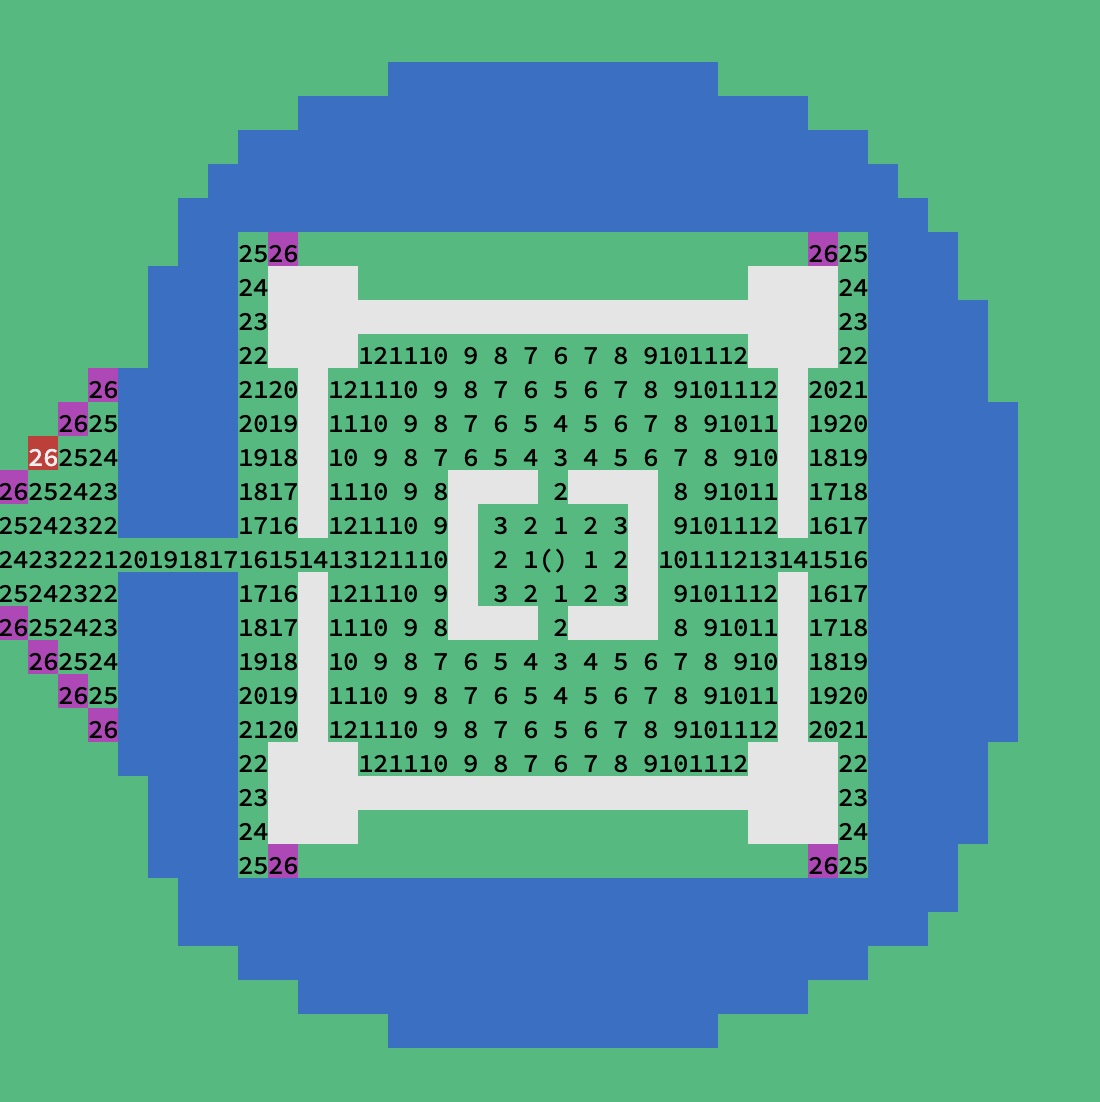
Up to this point, the code has almost exactly mirrored what is in the pseudocode above. Each iteration of the search loop takes a cell from the queue, and adds each of its neighbors to the queue if they haven’t already been explored.
Building the Shortest Path
Now that we have reached the destination, we need to build a sequence of moves that will bring the player to the destination along the shortest path. At this point, the algorithm will enter a second (simpler) phase. The modified demo version of the pathfinding program also illustrates this process.
We are going to build the path starting from the destination and working backwards. The distance array from the first phase of the search gives us all the information we need to reconstruct the path, but only if we work backwards. The screenshot below shows the first step of this process, which you can view by pressing space again.
Notice that the destination in this example was reachable in 26 steps;
that means the second to last cell on the shortest path must be next to the destination, and must be reachable in 25 steps.
The chosen cell is highlighted in yellow below, and the move direction at that cell is indicated with << characters to indicate a move to the west (DIR_W).
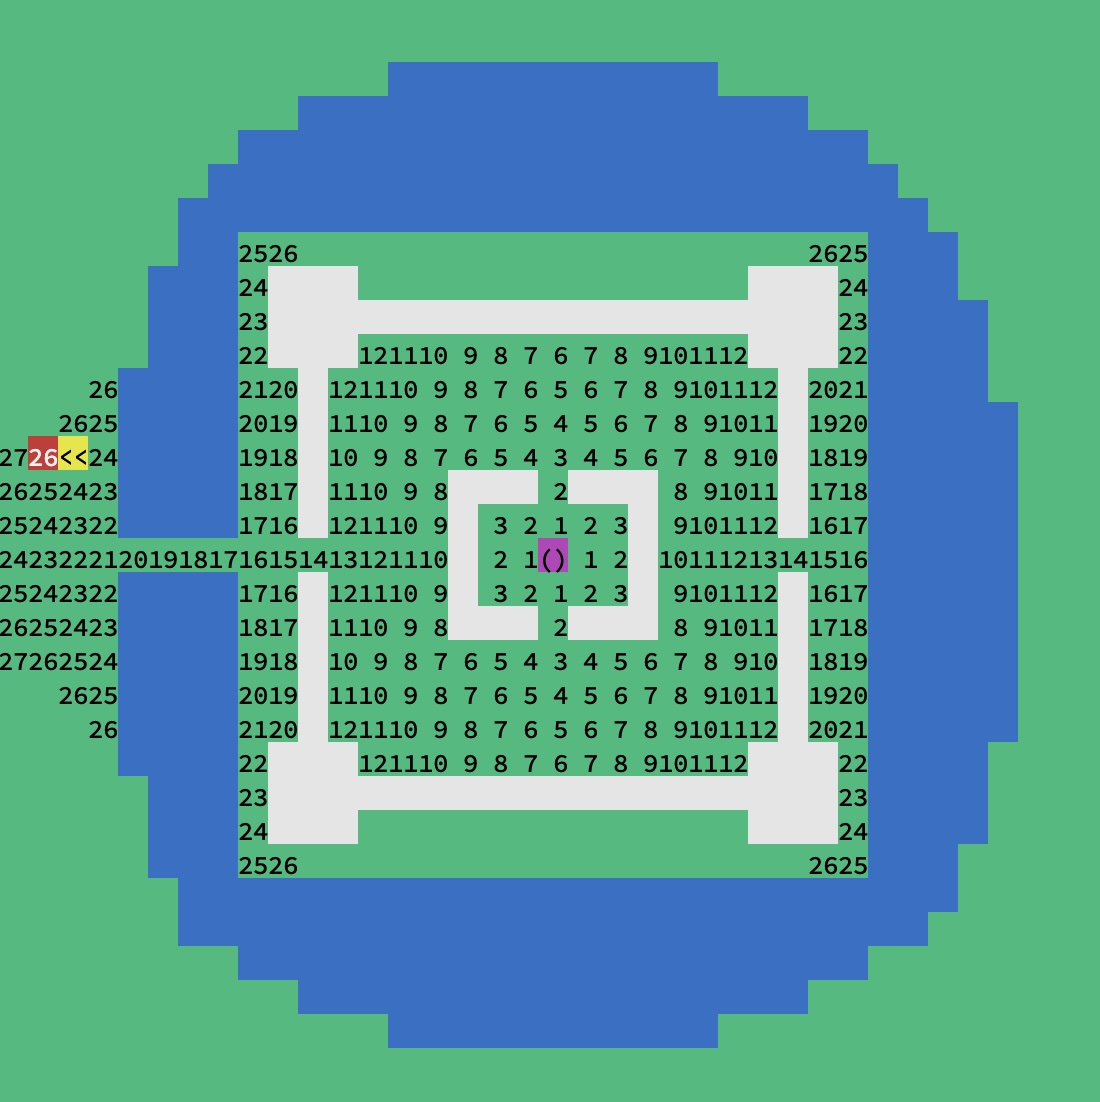
A careful observer may notice that there were two cells next to the destination with distances of 25. The algorithm could have chosen either cell, since they must appear on alternative shortest paths. Press space again to move the algorithm forward by one iteration:
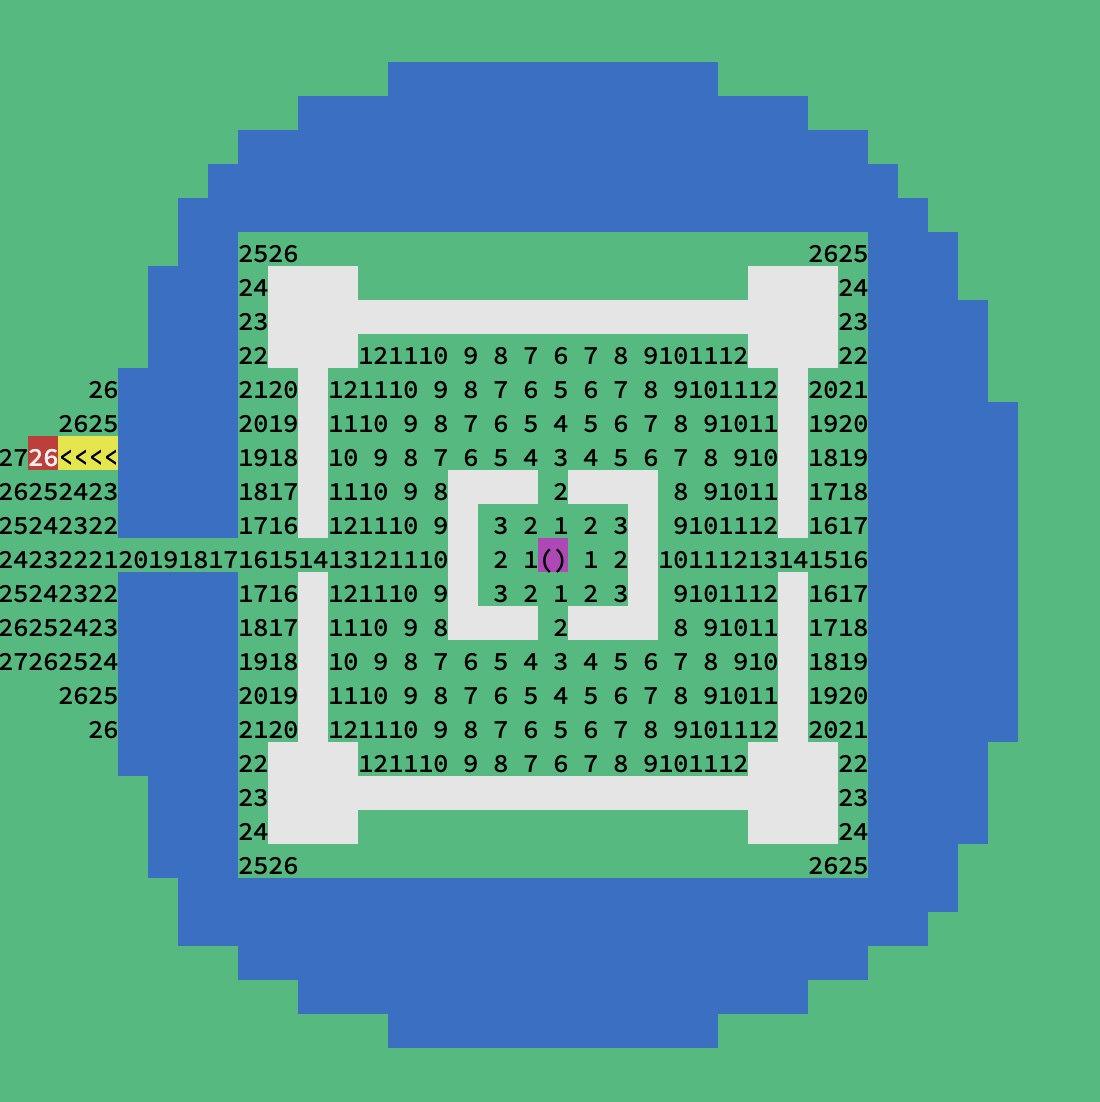
The algorithm has added another move to the west. The newly added cell was chosen because it is next to the start of the path built so far and is one step closer to the starting point (24 steps versus 25 for the start of the path in the previous step).
Continue pressing space to expand the path backwards:
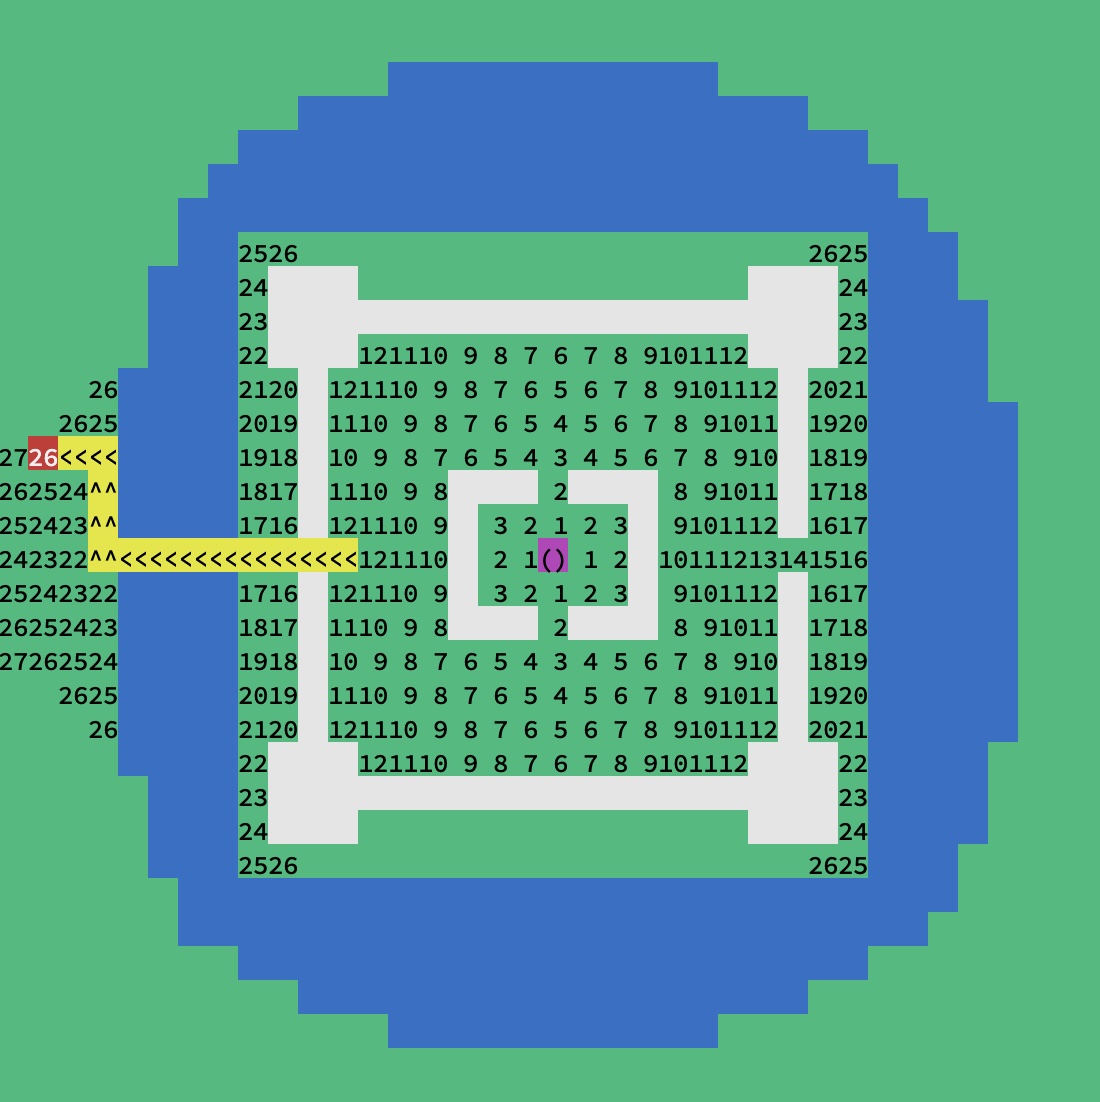
If you continue pressing space, the algorithm will eventually reach its final state:
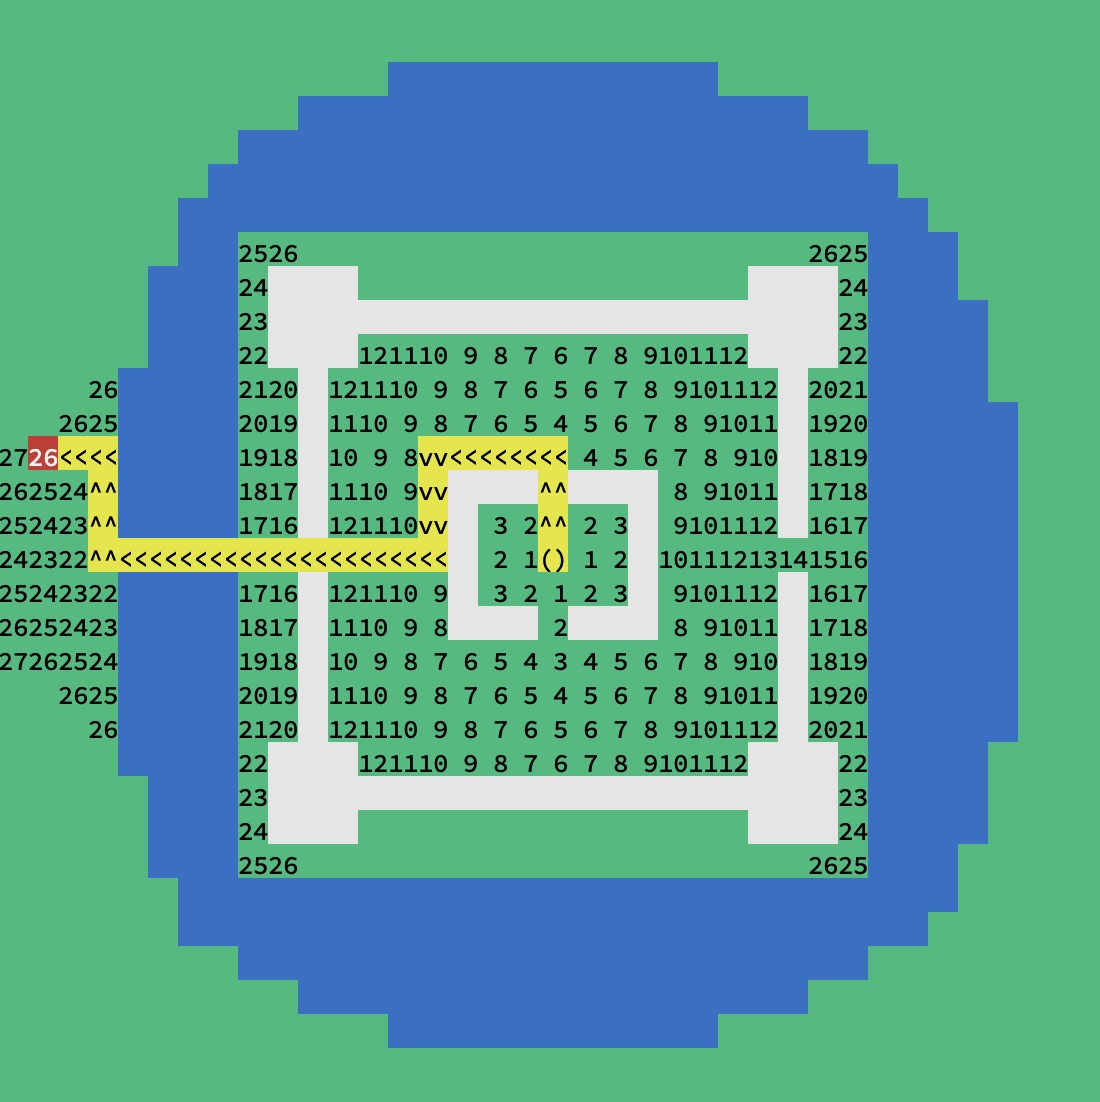
Now that the algorithm has built a sequence of moves that should bring the player to the destination, the plan_route function is complete.
These moves should be stored in the movelist_t passed to plan_route (in the correct order!).
You can press space once more to return to the normal game loop and watch the player move along the chosen path.
Tips
Here are a few tips that may help you with your assignment:
-
Do not add the algorithm visualization functionality to your implementation. The algorithm visualization version is there to help you understand how the algorithm runs.
- You may find it helpful to display some information from your
plan_routefunction (like an iteration count, path length, etc.). You can do this by callingmvprintwinside ofplan_route, but you’ll need to callrefresh()for output to appear. You’ll probably want to pause so you can read the output. This code fragment will wait until the user types space:while (getch() != ' '){} -
Think carefully about the movement directions and the order of moves when you are building the path. If a visited cell is to the right of the destination, you’ll need to move left to get from that cell to the destination. Think carefully about the order that moves are added and removed from the movelist when you decide how to add them, as well.
-
If you want to quit the algorithm visualization demo while the search is running, you will need to type ctrl+C.
- If your
pathfindingprogram crashes with AddressSanitizer errors, they may be difficult to read. This happens because ncurses puts the terminal into a mode where newlines don’t return to the leftmost column of the screen. If you can’t read the output, you can ask AddressSanitizer to send error reports to a file like this:$ ASAN_OPTIONS="log_path=log" ./pathfinding castle.mapThe program should run normally, but you’ll find any error reports from AddressSanitizer in the file named
log. If there are no errors, thelogfile will not be created.
Q&A
- Aren’t
movelist_clearandmovelist_destroythe same thing? - They might be implemented the same way, but they mean something different at the interface level. Removing all items from a list is conceptually different from freeing all the memory used to store a list.
- Do we need to use
movelist_tin theplan_routefunction? - Yes, but not as the queue for breadth-first search.
The breadth-first search will use a queue of coordinates.
You will eventually need to add moves to the
movelist_twhen you find a path.
Requirements
To receive credit, your homework must meet the following requirements:
- Movelist Implementation:
- You must correctly implement a movelist structure that works with the starter code.
Your implementation must cover all of the functions declared in
movelist.h, not just the ones used in the starter code. - Path Search:
- You must a
plan_routefunction that correctly finds the shortest path to the destination. The path search process must implement a breadth-first search, and then reconstruct a path using the process described in the assignment. - Code Style:
- Your implementation must follow all of the code style requirements for the class as of the time the assignment was released. Submissions that build with compiler errors or warnings will not receive credit. There may be changes to code style requirements that apply to this assignment, but these requirements will not change during the last five days the assignment is out.
- Code Organization:
- Your code must be organized into functions with a clear, sensible purpose. Your implementation should not have any unreasonably large or complex functions. If you are unsure about whether your code is disorganized or overly complex you can ask the instructor for feedback on your design.
- Safety:
- Your program must not rely on unsafe or undefined behavior. Some code style expectations also relate to safety (like checking for errors from standard functions) so those issues may receive deductions in both categories. Make sure your implementation never reads from uninitialized variables, always accesses arrays in bounds, and does not access storage locations after they have gone out of scope (i.e. do not return pointers to a function’s local variables). Unsafe code may cause your program to crash, but there will be a deduction in this category even if the program appears to work correctly.
- Memory Management:
- Your program must free all memory allocated with
malloc,realloc, orcalloc. Memory should be freed as soon as you are done using it, not just at the end of the program’s execution. Remember that using memory after it has been freed is unsafe.
Class Concepts
You can complete this entire assignment using concepts we’ve covered in class as of the assignment’s release, but you may find it helpful to incorporate material we cover in class after the assignment is released. You are welcome to use concepts covered in class during the assignment period, but you may not use any C features we have not discussed before the assignment deadline. Using concepts we haven’t covered by the time you turn in your work will result in a grade deduction.
Academic Honesty
As with all work you do in this course, the academic honesty policy applies to your work on this homework assignment. Please review the syllabus for policies on individual homework to make sure you understand the resources you can and cannot use for this work. Academic honesty violations will be reported to the committee on academic standing, and can result in penalties for your grade on this assignment or the entire course if you are found responsible for the violation.
Copyright © Charlie Curtsinger
 This work is licensed under a Creative Commons Attribution-NonCommercial-ShareAlike 4.0 International License.
Materials for this course are derived from work by Nicole Eikmeier, Fernanda Eliott, Barbara Johnson, Titus Klinge, Peter-Michael Osera, Sam Rebelsky, John Stone, Henry Walker, and Jerod Weinman.
This website was built using Jekyll, Twitter Bootstrap, and the Bootswatch Cosmo Theme.